This is an updated post to my previous one on BlueIris and Deepstack. The setup I described in that post worked for over two years. However, I am in the process of moving and was looking to streamline things. And also seeing if there was any way to improve my already functioning setup. Back 2 years ago I had searched and searched for a way to get alert images from BlueIris to HomeAssistant but couldn’t figured out a way. Last week, I decided to try another search of the interwebs to see if anybody had figured it out, and I stumbled across this thread here. I fully recommend giving it a full read, though note that there have been changes since the initial post. I’ll also point out a few things below that might help streamline things.
This guide assumes a few things. First, you have BlueIris setup. Second, you have configured BlueIris to use MQTT to communicate to HomeAssistant. Though the dev is not working on the integration anymore, I’ve found this one to work the best. The dev also has an excellent guide on how to configure MQTT that’s worth a read. Note you don’t NEED to use the HASS integration; you can configure most of what is discussed below just using the MQTT setting described in the documentation for the integration. I have just found the integration to be easier to use.
Hardware
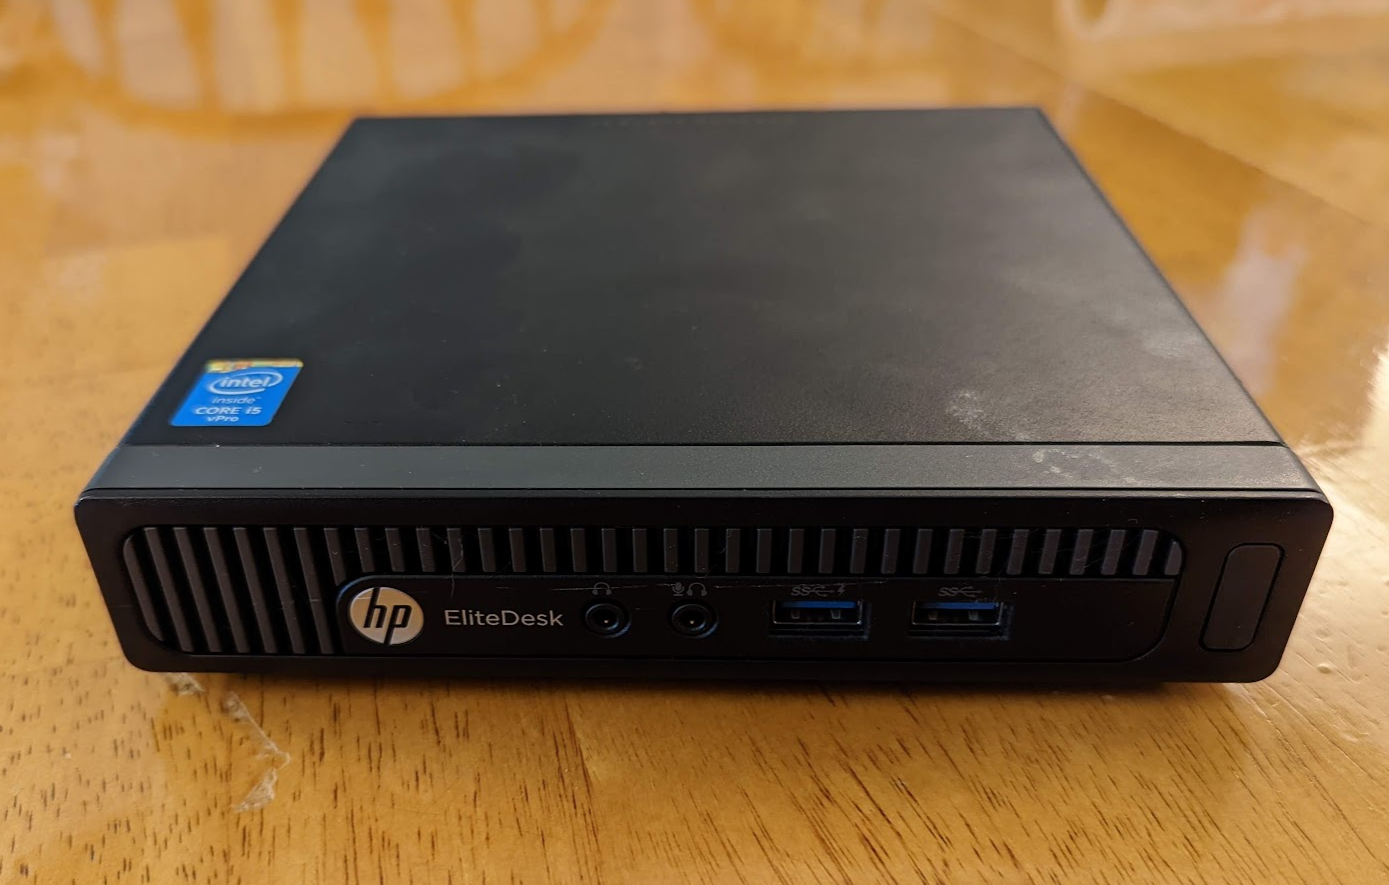
For the past 2 years, I’ve been running BlueIris on a dedicated box, specifically an HP EliteDesk G1 Mini, with an Intel i5-4590T and 8gb of RAM. Overall it did….fine. It could handle the cameras I was throwing at it (mostly Eufy indoor 2ks and a few Reolink 410’s), but whenever I would try to remote into it and open the BlueIris console, I would start hitting 100% CPU utilization and things were….slow. That’s partly why I felt the need to separate Deepstack away from my BlueIris box because I was afraid if I started trying to run Deepstack on the i5-4590T things wouldn’t go well.

As mentioned above, I’m moving into a new house (literally, it’s a new construction) which means I got to make some design decisions, including running conduit to many locations. Which opens up the possibility of outdoor POE cameras and hardwired indoor cameras. No more WiFi! I realized though that there was no way the EliteDesk was going to be able to handle the significant increase in megapixels I was about to throw at it. The current setup is 24 megapixels; the new house is probably going to be closer to 50 when I’m done. I looked into buying an upgraded EliteDesk as I love the small form factor devices, perhaps a 6th gen i5-6500T. The cost of one of those was around $200 on eBay and I figured for ~$100 more I could build myself a 10th gen, i5-10400 rig to match the hardware I have in my Proxmox server. That way I have some hardware redundancy in case of failures. I ended up going a bit over budget because I bought a new case and power supply but all in all I’m happy with my decision.
Here’s my hardware list:
On a side note, I’m a huge fan of Fractal Design cases (literally every single case I’ve ever bought is a Fractal) and the Meshify 2 Compact doesn’t disappoint. Easy to build in, looks great.
After getting everything running, the CPU utilization now hovers around 5-10%, versus on the old hardware it was usually around 40-50%. And best of all, the power utilization only went up maybe 20 watts overall. That also includes the fact I added a spare 6TB HDD in the case so now I’m able to record directly to disk. Before I was shifting archived footage off to my NAS.
Intel gvt-g
On another brief sidenote, my first thought was to try to run Proxmox on the new setup to go along with the Proxmox server I already ran. That way I could possibly migrate things over in the case of needed downtime or hardware failures. I set it up, got the Windows VM running and successfully passed through the iGPU to the VM. I started up BlueIris and everything seemed to be working. For about 24 hours I had no issues and I thought it was going to work. Then suddenly out of the blue I started getting system lockups on both the VM and the Proxmox host.
Ultimately, I do not recommend trying BlueIris in a VM and try to pass through the iGPU for QuickSync. You can read more about the issues people have had with gvt-g here. My experience with performance wasn’t as bad as IronicBadger’s was, but the system instability was a deal breaker.
Deepstack Setup
Initial Configuration
As I described in my previous post on Deepstack and BlueIris, what I was after was a way to get images of persons/cars being detected to my phone via HomeAssistant. The other ways I had tried didn’t allow me to filter out the notifications so that I didn’t get alerts when I really didn’t care to get them (like when I’m leaving home). So I worked out a somewhat convoluted approach in which:
- BlueIris would detect motion and trigger an alert.
- HomeAssistant via MQTT would pick up on that trigger and in turn trigger an image scan with Deepstack using a custom component.
- If Deepstack determined there was in fact a person/car, it would then alert me.
While it was overly complicated, it did in fact work pretty well. I reliably got alerts via Telegram whenever a person or car was detected. I think my main problem with this approach was that there was some lag. First the alert would have to go out via MQTT to HASS, then HASS would have to take a snapshot and send it to Deepstack, which then had to process it and return it to HASS, which then would send my the notification. I’d say the overall time between motion event and alert was 5-8 seconds. Not bad, but not great.
Now that I finally had better hardware that I felt more comfortable running Deepstack and BlueIris at the same time, I started to play around. Hat tip to Rob over at TheHookup on Youtube for a pretty detailed explanation of how to setup BlueIris and Deepstack. I suggest giving this video a watch:
This one is older (and somewhat outdated) but I think still worth a watch:
I haven’t yet tried the substream recording/upgrading to higher res on motion because 1) HDDs are cheap and 2) the Eufy cams I’m running don’t have substreams so it doesn’t seem worth it. Maybe with the new cams (I’ll be sharing which ones I’m going with later) I’ll start doing this.
Alert Settings
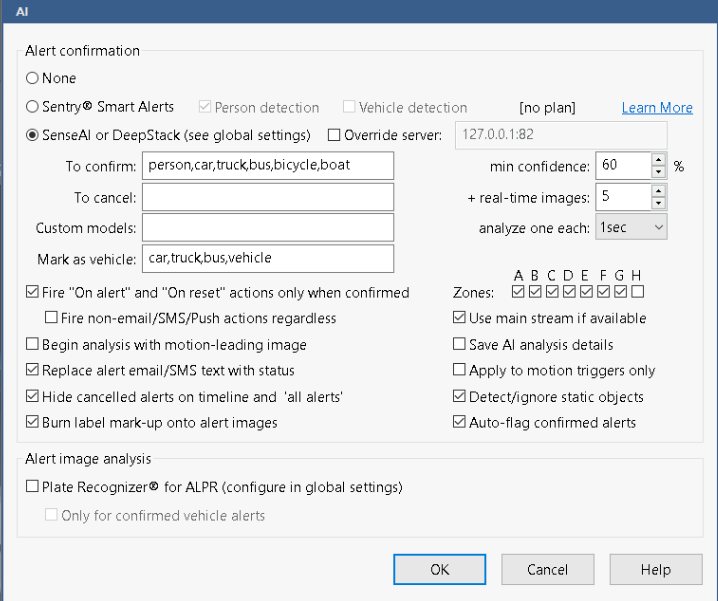
I won’t go through all the setup for Deepstack and BlueIris as I think that’s well covered in the video. I also think Rob’s suggested settings for AI are pretty decent, though I turn off “Begin analysis with motion-leading image” to try to get the best snapshot of the person or car I can. Here’s my typical settings:

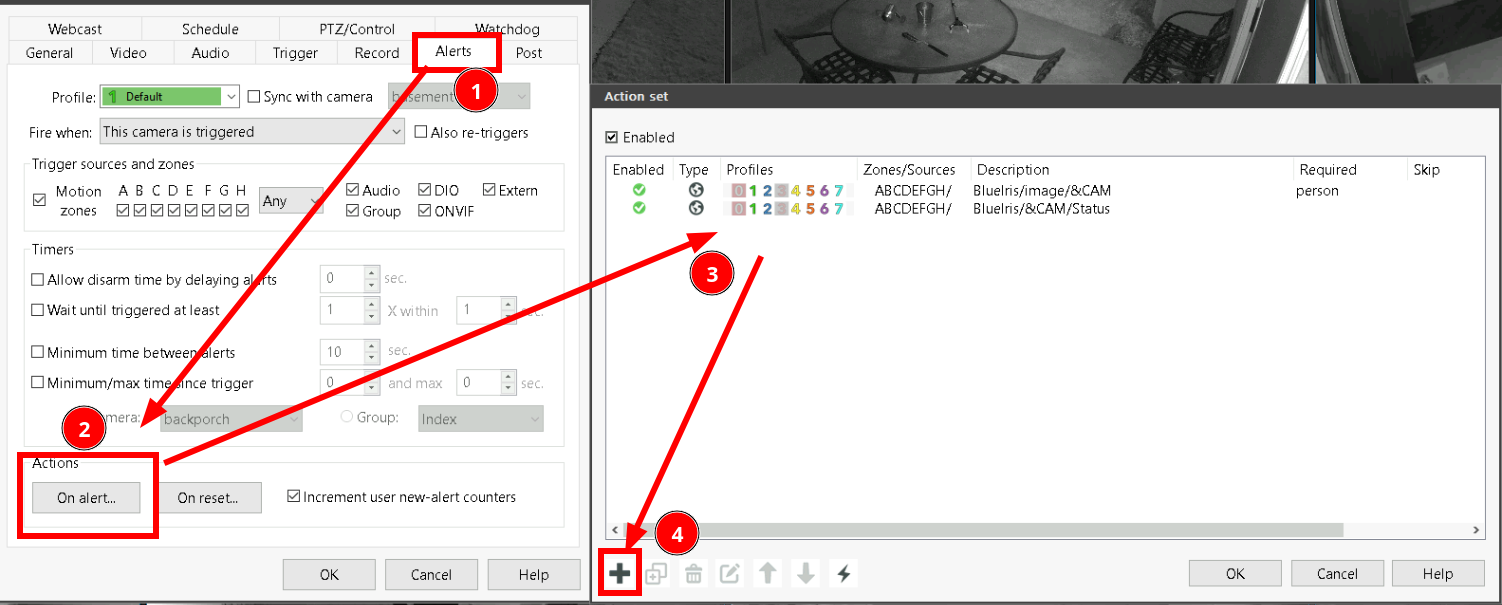
You absolutely should tweak the settings and the confidence levels to fit your own needs. Now to get the alert image into HASS, you need to go to the Alerts tab. At the bottom, click “On alert…” Click the plus icon and click “Web request or MQTT”.

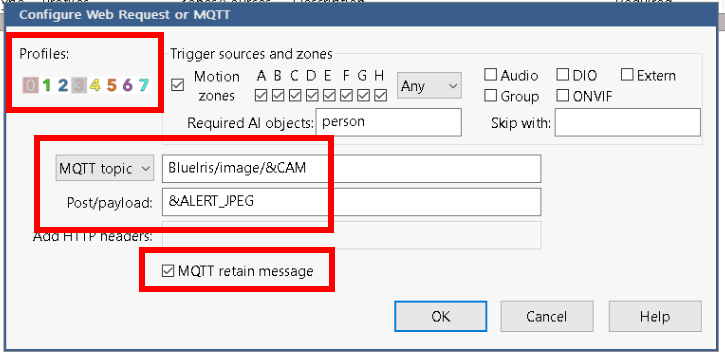
For MQTT topic, I would recommend something like BlueIris/image/&CAM where &CAM will automatically be substituted by BlueIris to be the shorthand name for your camera (makes copying/pasting for multiple cameras easy). I like to make sure all the images are under the same subtopic just for organizational purposes, but you could configure yours however you like. The Post/payload must be &ALERT_JPEG as that’s the secret sauce that tells BlueIris to send the alert image to MQTT in Base64 encoding. I also enabled MQTT retain message so the camera entity in HASS you’ll set up below always has an image to pull and you shouldn’t get any errors. Here’s an example of what mine looks like:

You also can modify what profiles should the alert image get sent. For example, I have a “Vacation/Alarm” profile where all my cameras (indoor and outdoor) send alerts, but a “Default” profile where indoor alert images are not processed. Nobody wants pictures of them walking around in their underwear IMO….
Also, I highly suggest ordering these alerts so that the image is sent first. If the alert triggers the motion sensor in HASS first you may not get the updated image.
HomeAssistant Integration
Now that the hard part is done, the HASS integration is actually really simple. All you really need to do is create an MQTT camera based on the topic you set above. And specifically use the b64 encoding option. Also, remember that starting with 2022.09, all MQTT entities need to be under the mqtt key in your configuration.yaml file. So your configuration may look something like this:
mqtt:
	camera:
		- topic: BlueIris/image/driveway
		  name: Alert Driveway
		  unique_id: driveway_alert
		  encoding: b64
Change the topic to match whatever you configured in BlueIris. Restart HomeAssistant and you should be able to see a new camera entity showing the last alert image from BlueIris! Now to send the image I’ve found the easiest way is to take a snapshot to my local disk and then send that image file to my notification app of choice, which is Telegram. You could pick whatever you prefer without much issue.
I’m able to do a little more fine tuning on the HomeAssistant end, like rate-limiting the number of notifications I get to 1 ever few minutes (so my phone doesn’t melt from all the notifications). Now my notification setup looks like this:
- BlueIris would detect motion and triggers a scan with Deepstack
- If Deepstack determines there’s a person, the alert image is sent to MQTT and the motion sensor in HASS is triggered.
- HASS then notifies me.
The processing time here is more around 3 seconds (instead of the 5-8 before). It’s not a huge improvement but it feels far less convoluted.
Conclusion
I’m pleased with both the new hardware (it’s so much faster!) and the new way to get my alert images into HomeAssistant. There wasn’t anything “wrong” with my previous setup as I don’t think the performance/speed improvement is all that great, but it does feel a lot cleaner and simpler than before. Also feels easier to maintain should there be issues in the future.
