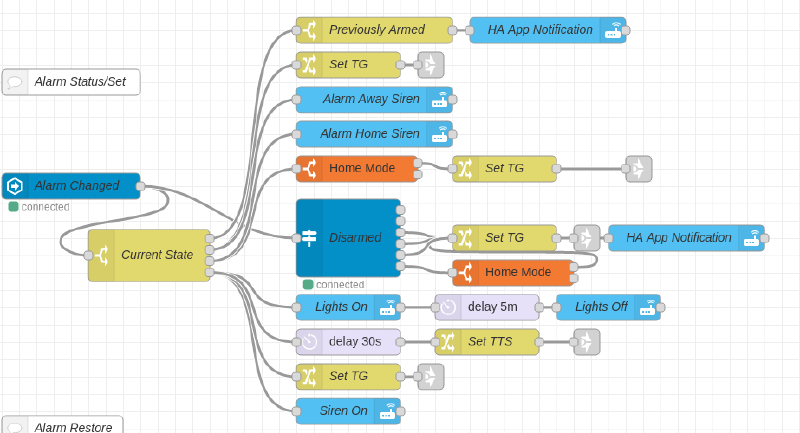
As mentioned in one of my first posts, I love NodeRed and use it for virtually all of my automations. It’s a visual automation editor that I find much easier to use than the YAML-based automation system in HomeAssistant. If you’re a visual person like me (and even if you aren’t) you may find NodeRed simpler to use. I also much prefer the easy debugging my automations that was difficult to do in HomeAssistant.
In this post I’m going to go through how to install it, install some basic palettes, and how the integration with HomeAssistant works. Let’s get to it.
Installation
Docker
Installing NodeRed is really easy. I run it in Docker and below is my Docker-Compose file that you can use. If you aren’t already using Docker or Docker-Compose I’ll point you here.
version: '2'
services:
  nodered:
    container_name: nodered
    image: nodered/node-red
    volumes:
      - ./nodered:/data
      - /etc/localtime:/etc/localtime:ro
    restart: always
    ports:
      - "1880:1880"
    environment:
      - TZ=America/New_York
That’s all you need. Run docker-compose up -d nodered (while you’re in the directory where the docker-compose.yaml file is located) and then open your browser. Type in http://YOUR_IP_ADDRESS:1880 and you should be greeted with a page that looks like this:
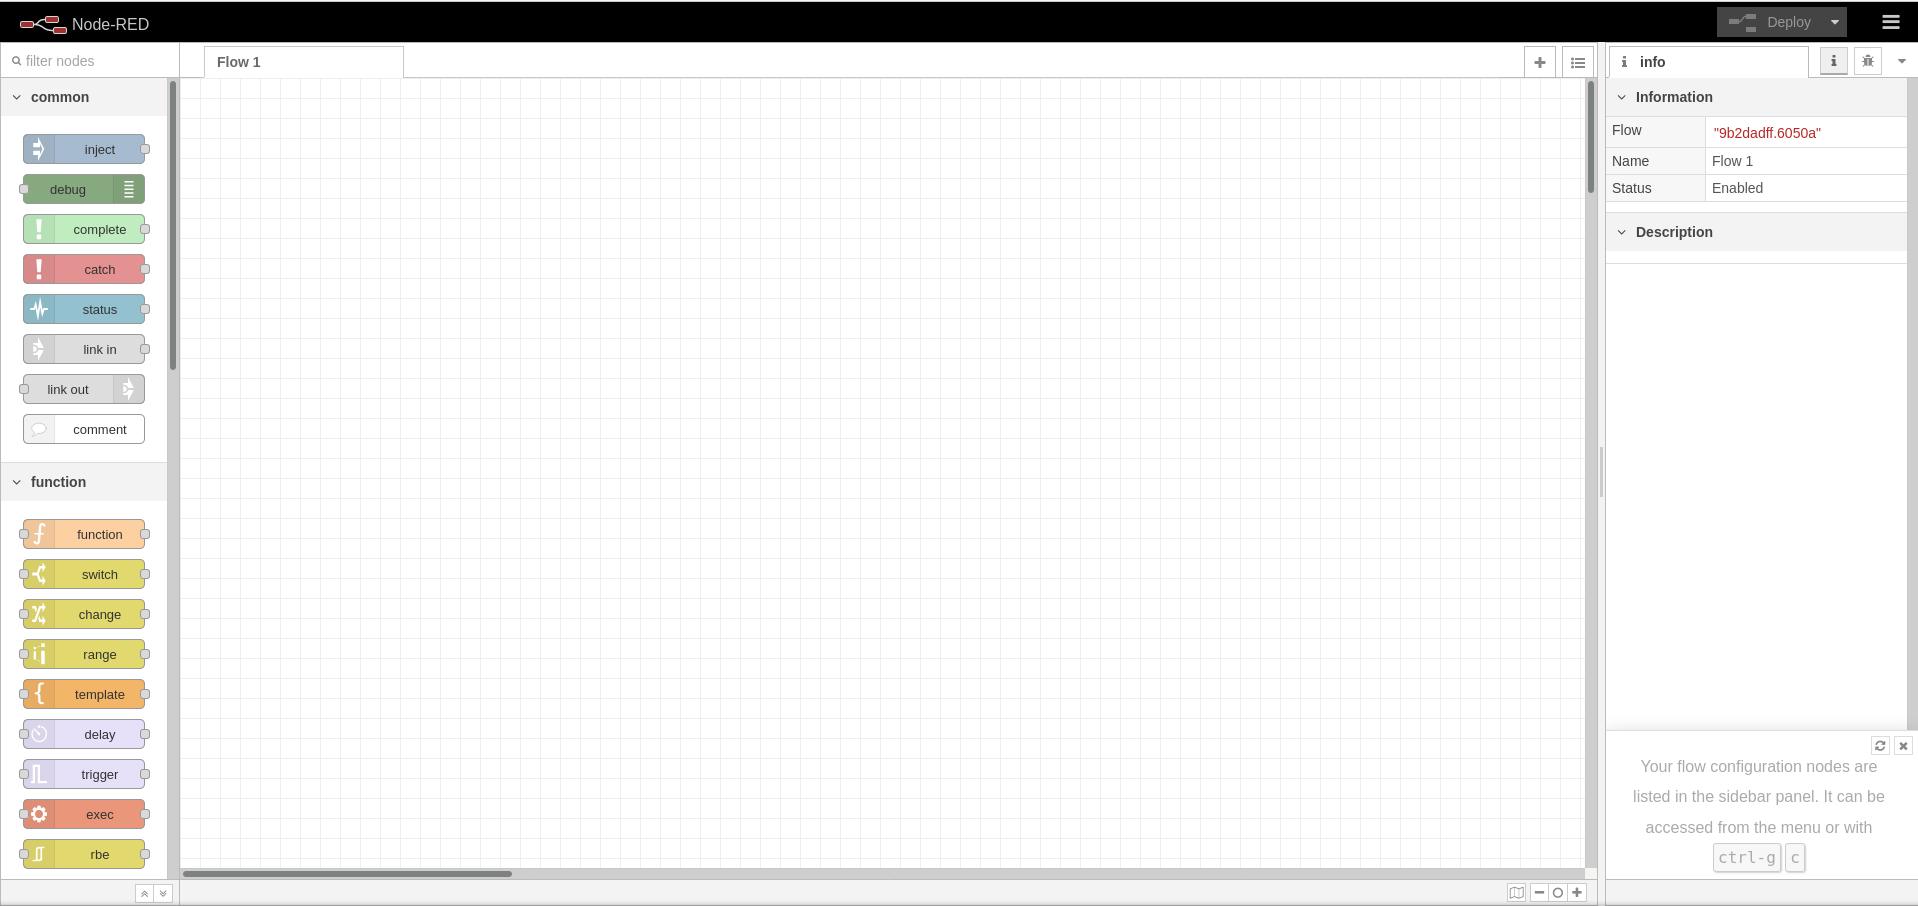
Your new NodeRed install
If you aren’t, a possible issue is ownership of the NodeRed folder. Run sudo chown -R YOUR_USER:YOUR_GROUP /path/to/your/nodred/dir. If you don’t know what I mean by user/group see this article. Restart the container and you should be all set.
NPM Install
Don’t want to use Docker? That’s fine. You’ll just need to follow the instructions over on the NodeRed website here. In a nutshell, you’ll need to install node.js and then run this command:
sudo npm install -g --unsafe-perm node-red
Then all you need to do is run node-red from terminal and NodeRed will start. You’ll probably want to run it in screen or create some kind of systemd process to run NodeRed in the background as you want it running all the time (otherwise no automations!).
Home Assistant Add-On
It’s also possible to install NodeRed if you’re running “Home Assistant” (formerly known as “Hass.io”). Check out more information here.
Next Steps
So now we have NodeRed installed and running. Let’s figure out what everything is. If you’re a visual person, check out this video by The Hook Up (2 years old but still pretty accurate though some things have changed).
On the left side of the screen are all the different “node” types you can use. A node is a thing that you can do to execute a function/command depending. You’ll see more on this later
At the top you have something called “Flow 1.” Each “page” in NodeRed is called a “flow,” but personally I think it’s easier to just think of them as pages.
On the right side is an info bar and also very importantly a debug panel button and the deploy button. The info bar is useful when you click on a node to get some information about how the node can be used/what features it has. The debug panel (bug icon next to the “i” is useful for debugging your automations and seeing where you have problems. Finally the “deploy” button is what “saves” everything. You can configure the deploy type by clicking the arrow next to “deploy.” I would suggest switching the deploy style to “Modified Nodes.” The default of “Full” will literally redeploy every single node in NodeRed. So if you’re running a timer, it will reset the node every time you hit deploy. Instead, if you do “modified nodes” it will only deploy the nodes you actually changed. This makes more sense to me, but the decision is yours.
Useful palettes
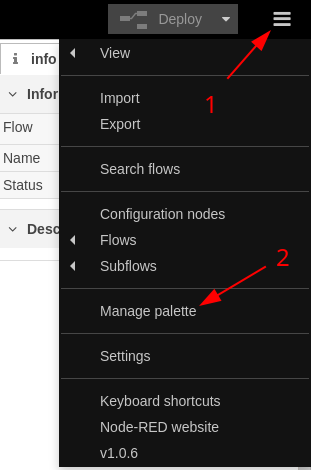
There are TONS of palettes out there that let you do all sorts of crazy things. To install a node, all you need to do is click the 3 lines in the top right corner and then “Manage palette.” Click on “Install” and from there you can search for an install a module/palette.
Personally I’ve found a few very useful. Here’s a list with a brief description of what they do and why I like it.
node-red-contrib-home-assistant-websocket - We’ll get to this one more in a minute, but this is what you need to connect HomeAssistant and NodeRed.
node-red-contrib-schedex - This node acts similar to a time trigger in HomeAssistant but also lets you add an off time as well as use sunrise/sunset as a time (or golden hour, dawn/dusk, and a whole host of other times of day) along with offsets if you need to adjust the time slightly. I use this one a lot to run automations at certain times of day/days of the week.
node-red-contrib-time-range-switch - Time Range is similar to a time or sun condition in HomeAssistant. When an input is passed in it checks to see if the time of day is within the parameters you set (such as between 12pm and 3pm, or sunrise to sunset). If yes, you can set the output to go one way. If no, then the output can be sent another way.
node-red-contrib-weekday - Similar to Time Range but this one is for days of the week. If an input comes in and the day is one that you select (say Monday-Friday), the output can be routed one way, and if it’s outside of that it can be routed another way.
What about node-red-contrib-bigtimer? I know a lot of people swear by BigTimer. Personally I found it way too cumbersome and complicated for my purposes. There’s so many outputs/things you can do that I was just overwhelmed and felt the 3 time/date palettes above were much easier to work with/use.
HomeAssistant
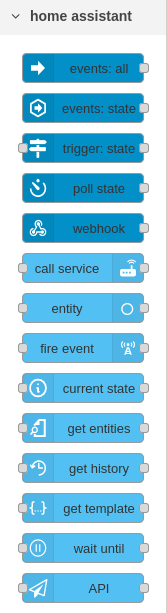
Let’s get NodeRed talking to HomeAssistant. Go to Manage Palettes and install, and search for node-red-contrib-home-assistant-websocket. Then click “install.” A popup box will show up asking you to read the documentation. Just click “install” again. You should see a notification that a bunch of new nodes were added to NodeRed. If you scroll all the way to the bottom on the left side, you should now see something like this:
Before we get into what each node does, we need to configure NodeRed to talk to HomeAssistant. Pick any HomeAssistant node, click and drag it onto the grid. Then double click on the node and you’ll see a screen that looks like this:
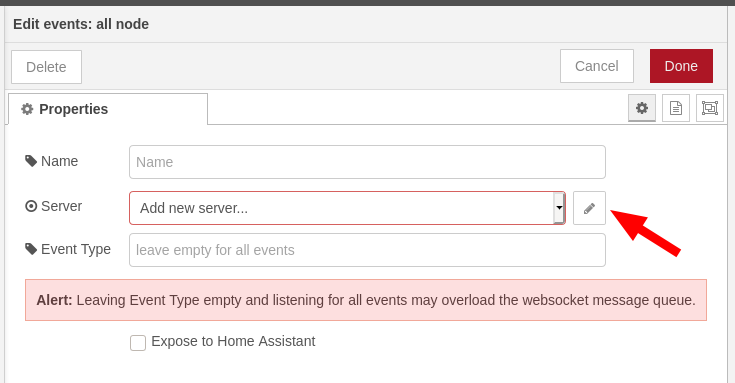
Click the pencil button next to “Add new server.” If you’re running HomeAssistant/HASS.IO then click the “I use the Home Assistant Add-on” option. Otherwise fill out the base URL (I’d suggest using your local server IP/port even if you have have HomeAssistant publicly accessible). You also will need to get a Long Lived Access Token (see below image). Once you have that, click “Add” and you’re set.
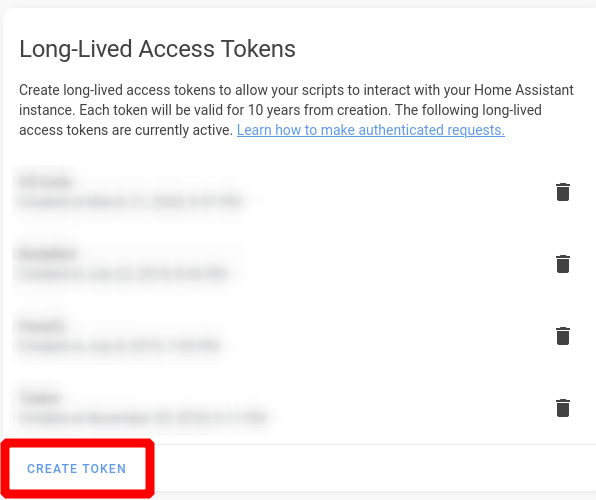
Scroll all the way to the bottom of your profile in HomeAssistant and click ‘Create Token.’ Name it, then copy the value to the ‘Access Token’ line in NodeRed
Now that we have HASS and NodeRed talking, let’s go through some of the nodes. Personally I don’t use the Webhook, Fire Event, Get Entities, Get History or API nodes. I’m sure they have use but I haven’t found a need for them. Here’s a quick use case for the other nodes.
Events: all -> Useful for picking up on events like deconz, zwave.node_event, and others. I don’t use this one a ton but it’s super useful when you need it. Only has an output.
Events: state -> Probably one of my most used nodes. You can pick an entity_id to target, or you can do a substring or regex to use more than one entity at a time. You also can make the node act like a true/false if you put a state, OR you can leave the “if state” field blank and it will output whenever the state changes. This is the man way I trigger my automations in NodeRed.
Trigger: state -> Very similar to the Events: state node, but has the added benefit that you can set constraints on it. For example, if you have a temperature sensor and you only want it to trigger when the temperature is between 70 and 72 degrees just set the constraints appropriately it will output only when those conditions are met. You also can add additional constraints for other entities. So if you want the automation to trigger, but only when the temperature sensor is between 70 and 72 AND you aren’t home, you can do that with the trigger: state node. You also can set different outputs depending on the state
Poll state -> useful if you want to check the state of an entity and trigger if the value changes. I don’t find a ton of use for this since most of my sensors update regularly but if you have some that are slow to update, it can be useful.
Call service -> the main way to do something with HomeAssistant. This will probably be the node at the end of your automation. It’s basically the same thing as the “action” in HomeAssistant YAML automations, so think of it that way.
Current state -> I use this mostly like the conditions in HomeAssistant YAML automations. You can use it to check the value of an entity and to send the flow one way if it’s true and another way if it’s false.
Get Template -> I often use this node similarly to the current state node. Basically you can use it to run a template in HomeAssistant and use that output of that template in your automation. I like to use template nodes to replace strings of current state nodes as you can do {{ state('input_boolean.number1') == 'on' and state('input_boolean.number2') == 'on' instead of doing 2 different current state nodes. One thing I do with template nodes is I usually change the results output to msg.results. That way I can keep the value of the msg.payload but then also have the output from the template in case I need to use that later. Also, if you’re using the template node to evaluate conditions of entities so the result is true/false, you’ll want to put a switch node after it so you can filter out if the statement is true/false depending on which you want. The node will always output no matter what.
Wait until -> A handy one to use if you want to trigger an automation but then wait a bit before continuing. Example I have is that when the house door to my garage is opened it sets off an automation but then waits 5 minutes to see if my car starts. If it does, then the automation continues and opens the garage door. If it doesn’t then the automation stops. You can customize how long for the timeout (0 is no timeout).
NodeRed Integration
There is a NodeRed Custom Component for HomeAssistant that provides a few more features, most notably the ability to turn some things on/off in NodeRed from HomeAssistant as well as create sensors in HomeAssistant. This has some interesting use cases that I’m still exploring so I would encourage you to install and take a look. You can read more about it in the documentation here.
Other Useful Nodes
There’s a lot of other really useful nodes in NodeRed that I use all the time. The debug and inject nodes are absolutely invaluable for testing out new automations to make sure they work without having to wait for the automations to trigger on their own. The link in/out nodes are extremely useful for reusing bits of automation or service calls without having to repeat them over and over again. And the switch and change nodes are equally useful in causing my automations to split/move around in different ways depending on the value that’s received.
Conclusion
The above really is just scratching the surface of what NodeRed can do. I’m a visual person so I find it much easier to use that the HomeAssistant automation system, though I’m glad I learned that as it does help with figuring out service calls for NodeRed. I think the main thing I really like with NodeRed is the ease I can reuse things without having to write out hundreds of lines of YAML. I would strongly encourage you to try out NodeRed. You can easily set it up and use it in parallel with the HomeAssistant automations as you slowly transition things over. So you have nothing to lose!