In my last post, I discussed how I was moving off of Cloudflare and also moving to Caddy. After about a month of completing that switchover, I’m sticking to it. Still have a few issues with the way Caddy does things but overall it works.
In this post I want to discuss my Caddy setup, particular how I am not directly exposing my homelab/server to the internet but instead am routing all the traffic through a VPS. Conceptually it’s pretty simple, but it took me a while to actually implement. There’s many solutions out there for implementing a similar setup and there may be a simpler way to do what I’m doing but my way works so I’m not messing with it.
Overview
So why route everything through the VPS? A few reasons. First, I don’t have to expose my home server to the internet. That means that there are no ports open on my home firewall, particularly not ports 80/443. Second, I don’t have to reveal my home IP address to the whole world being a DNS record. And finally, I don’t have to worry about a dynamic DNS updater failing and losing access to my services should my IP address change. In essence, this provides me with a lot of the same benefits of Cloudflare but without being on Cloudflare. The downside is that it’s more complicated and has some more running parts, any of which could break and would bring down remote access to my apps, but I think the benefits are worth it.
So how do I do it? Here’s an image that explains it:
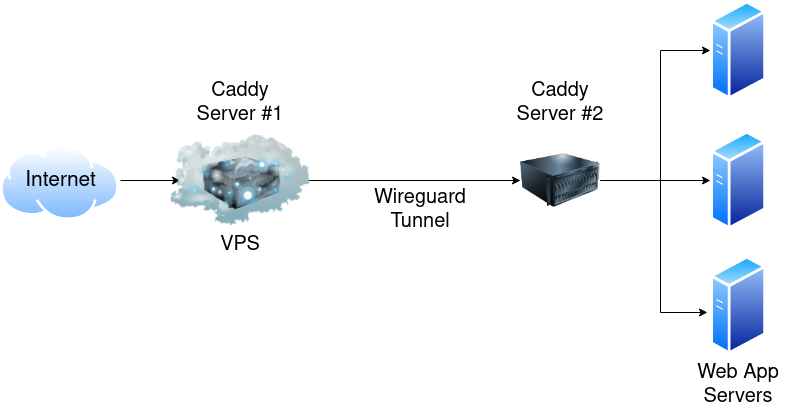
Basically traffic comes into the VPS, gets routed by a Caddy server running on the VPS down a Wireguard tunnel to a server running on my LAN in a DMZ. The DMZ server also runs a Caddy server and routes the traffic to the appropriate app server. For the record, yes, I know I could have used something like Nebula or Tailscale or Zerotier and built a mesh network where everything was interconnected. However, two things kept me from going down that path. First, I didn’t want to to have to set up/manage multiple connections to the VPS. More things that could possibly break. Second, I wanted to route everything through a single, well-hardened and secured server before crossing into my home network. And third, many of the mesh VPN options out there are either not open source or require you to use a proprietary server as the “main” hub. Nebula is an exception on both counts and I highly recommend reading this post if you’re interested in setting up Nebula, but it still was overkill for my needs as I just wanted a single tunnel/connection to worry about.
Setup
Now that we’ve talked about the why, let’s talk about the how. For this you’ll need a VPS, a reverse proxy (the examples below will be in Caddy but NGINX would work just fine too as would Traefik I suspect), and Wireguard. Not sure I’ve really ever mentioned Wireguard on this blog before but it’s amazing. If you’re still using OpenVPN just….stop. Wireguard is a hell of a lot more efficient and far easier to set up. There are tons of tools for configuring it and loads of GUIs you can chose. For this though I’m configuring it all manually.
Wireguard Setup
Installing Wireguard is fairly straightforward, just follow the instructions on the Wireguard page or check out one of the many, many blog posts/guides out there like this one. Once it’s installed, we need to create the tunnel. For that, you’ll need two sets of public/private keys. Generating them is pretty simple, the hardest part is keeping track of which key goes where. Hopefully the below example configuration files help make that clear. You’ll need to save the files in /etc/wireguard. Personally I saved mine as wg0.conf.
VPS Wireguard Conf:
[Interface]
Address = 10.10.10.1/24
ListenPort = 51820
PrivateKey = PRIVATE_VPS_KEY

[Peer]
PublicKey = PUBLIC_DMZ_KEY
AllowedIPs = 10.10.10.10/32
DMZ Wireguard Conf:
[Interface]
Address = 10.10.10.10/32
PrivateKey = PRIVATE_DMZ_KEY
DNS = 9.9.9.9, 149.112.112.112

[Peer]
PublicKey = PUBLIC_VPS_KEY
Endpoint = VPS_IP_ADDRESS:51820
AllowedIPs = 10.10.10.1/32
PersistentKeepalive = 25
Probably don’t need the DNS entries but figured it couldn’t hurt. You definitely want the PersistentKeepAlive to ensure that the connection remains open and doesn’t close/nothing gets blocked. You can change the IP address (in my case 10.10.10.1/24) to any private IP address range you want, but I liked the IP of the DMZ being 10.10.10.10. Easy to remember/type. I also limited the IP addresses to just those on the tunnel, otherwise you run into issues where DNS won’t resolve, no internet, etc. Plus, it’s the only traffic you need to route.
Once you created your config files on both servers, run sudo systemctl enable wg-quick@wg0.service and sudo systemctl start wg-quick@wg0.service. You can check the status with sudo systemctl status wg-quick@wg0.service and also trying to ping each end of the tunnel (so from the VPS ping 10.10.10.10 and on the DMZ ping 10.10.10.1). You should see successful pings. If not, check your firewall rules.
To ensure that the Wireguard tunnel stays up, I modified a script I found that pings the IP address of the VPS on Wireguard (in my case, 10.10.10.1). If that fails 3 times, it reboots the Wireguard systemd service. That obviously won’t help if the VPS is offline but it would help with any temporary odd blips. I added a cronjob to run the script every 5 minutes.
#!/bin/bash
# Modified from https://mullvad.net/en/help/running-wireguard-router/
# and https://wiki.r-selfhosted.com/guides/virtual-private-networks/wireguard/
# ping Wireguard gateway to test for connection
# if no contact, restart!

PING=/bin/ping
## DEBIAN
SERVICE=/usr/sbin/service

tries=0
while [[ $tries -lt 3 ]]
do
    if $PING -c 1 10.10.10.1
    then
            echo "wg works"
            exit 0
    fi
    echo "wg fail"
    tries=$((tries+1))
done
echo "wg failed 3 times - restarting tunnel"
## DEBIAN
$SERVICE wg-quick@wg0 restart
Caddy/Reverse Proxy Setup
Getting the Wireguard tunnel working was probably 90% of the battle for me, so I’m not going to heavily detail the reverse proxy part. Plus it will depend on what reverse proxy you’re using. If you have questions feel free to contact me and I’m happy to try to help/discuss!
Here’s my example Caddyfile on my Infra GitHub repo. The basic gist would be the same in NGINX, basically all you do is tell the reverse proxy to send the traffic to the DMZ server’s Wireguard IP address. On the DMZ Server, here’s my Caddyfile. The DMZ Caddy Server listens on port 80 at the URL you want, and then redirects the traffic to the appropriate server on the LAN.
As you can see, I terminate SSL on the VPS and route everything internally using HTTP. Some I know prefer to terminate SSL on the homeserver/DMZ, which is valid but I just found it simpler/more straightforward to do it on the VPS.
Conclusion
Now there are some downsides to this approach. The biggest one I ran into was that Fail2Ban no longer worked when running on the individual app servers on my LAN. The reason was that Fail2Ban would attempt to ban the correct external IP address but iptables only cared about the Wireguard IP address. IE Fail2Ban would add 100.40.39.38 to the banned iptables list, but iptables would only see traffic coming from 10.10.10.10 or 192.168.50.10 so the ban wouldn’t be effective. To get Fail2Ban working I had to implement rsyslog to send the various logs up to the VPS and then run Fail2Ban on the VPS. It works but it still feels like a hack and it would have been much simpler if I could have just kept running Fail2Ban on the individual servers. I’m intrigued by something like CrowdSec but haven’t had a chance to implement it yet.
The other thing to keep in mind is you’ll need to configure some of your apps to handle a trusted proxy, otherwise the IP address it will see is that of the DMZ server or the Wireguard tunnel.
This approach really works best if you aren’t funnelling tons of traffic through the VPS. Not because the VPS can’t handle it from a performance perspective but because most VPS providers cap your data. Linode, for example, allows 1TB a month on the $5 tier. For me that’s plenty but if you’re routing lots of say Jellyfin/Plex traffic through it you may want to consider a different approach (or directly sending heavy bandwidth apps directly to your LAN).
Overall, despite some struggles to get this set up, it’s been rock solid for me and I really like the way it’s running.